Holiday Mail Art: 5 Ways to Decorate Christmas Card Envelopes

By Amber Goodvin and Trish Berrong on September 9th, 2021
2150 ii 01b

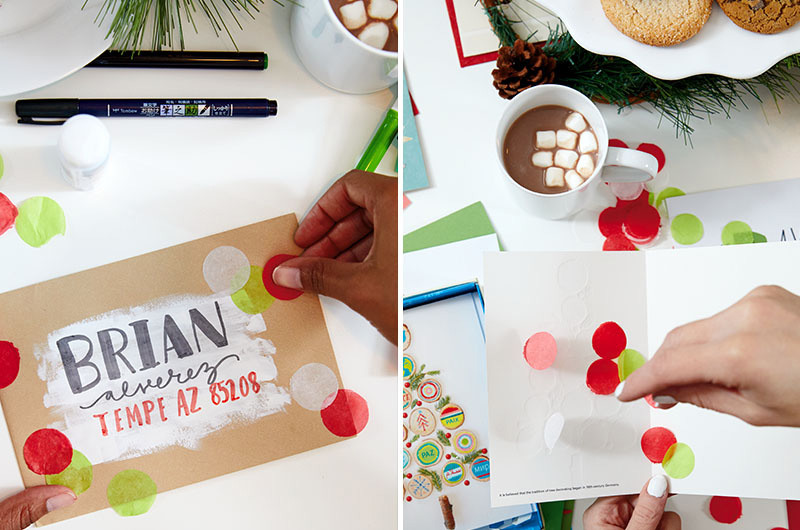
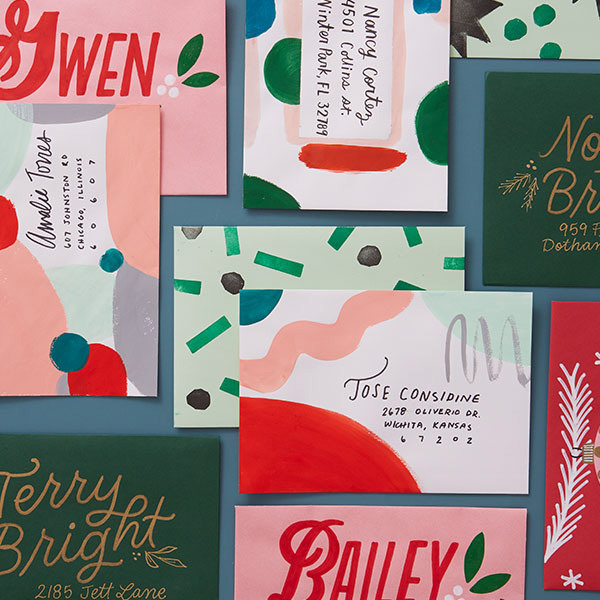
Holiday mail art is the best: A beautifully decorated Christmas card envelope is a gift. But a long card list might make addressing your envelopes seem like a daunting task instead of a glorious way to spend the evening. So we asked Hallmark artists to come up with easy ways to create hand-lettered envelopes that won’t take you all season long.

Here are five different gorgeous, easy ways to make everyone on your list feel like your very favourite person. And we’ve added bonus tips—the easiest way to add an envelope liner and some DIY confetti ideas.

2150 ii 01b
#

Holiday Mail Art with DIY Stamps

2150 ii 2

Supplies for making stamps

  • Craft foam sheet
  • Scrap pieces of cardboard
  • Scissors
  • Glue
  • Crayola brush markers
  • Archival ink pad in two colours (or ink brayer and paint)
  • Scrap paper or butcher paper (to protect your work surface)
2150 ii 3

How to stamp envelopes

  • Cut simple shapes from the craft foam—try stars or starbursts, circles or blocks.
  • Glue the foam shape onto a slightly larger scrap of cardboard.
  • Press your stamp onto the ink pad (or use a brayer to apply paint). Practice pressing the stamps on a scrap sheet of paper to get the right amount of pressure and to try different designs.
  • Open and flatten the envelope and stamp your designs. Make sure to leave room for the recipient’s name and address on the front and your own return address in the upper left or on the back.
  • Let your envelopes dry completely before you address them.

Pro tip: Invite your friends

“Wrap and yaps” are a thing, so why not have an arty party?

Check off two holiday to-dos in one crafternoon—catch up with pals and address your Christmas cards. Most important tip: Keep the treats non-messy and non-greasy so you don’t mess up your artwork. Snacks on sticks or toothpicks work great.

#

Cut Paper Christmas Mail Art

2150 ii 4

Supplies for cut paper designs

  • Scraps of coloured paper or leftover gift wrap
  • Scissors
  • Glue stick
  • Crayola brush markers
  • Crayola metallic markers or paint markers
  • White paint marker or Crayola silver glitter marker
  • White gel pen
2150 ii 3b e1630700081269

How to make cut paper envelope designs

  • Cut a super-simple shape from the paper. We made different ornament shapes and trees and tried a few first initials.
  • Lay your cut paper out on the envelope to figure out your design.
  • If you’re going to write or draw on the paper, do that before you glue it down—that way if you mess up, you don’t ruin the envelope.
  • Use the white paint or silver glitter marker to draw simple designs—branches, stars, garland strings—on your envelope.
  • Glue down your cut paper then add the address. Don’t forget to put your return address in the upper left or on the back flap.

Free download: Envelope decorating tips

Want a little inspiration? Download these tips for decorating and lettering your envelopes from Hallmark artists. Practice your designs on scrap paper before you commit to an envelope—or pencil everything in before laying on the paint.

#

Hand-Painted Holiday Mail Art

2150 ii 5

Supplies for hand-painted envelopes

  • Crayola acrylic paint (we are big believers in a limited colour palette—choose 3 colours and use white paint to make lighter shades)
  • Paintbrush
  • Artist masking tape (“low-tack” means it’s less sticky and won’t rip paper)
  • Scissors
  • Crayola brush markers
  • Scrap card stock or paper
2150 ii 6

How to make hand-painted mail art

To leave the perfect space for an address:

  • Cut a square or rectangle from your scrap piece big enough to write the address. Use the masking tape to stick it to the envelope.
  • Paint swatches of colour on the envelope—try abstract shapes, swashes or blocks of colour, squiggles and lines and dots.
  • If you’re going to layer colours, make sure you let one dry before adding another.
  • When it’s all completely dry, pull off the tape and paper scrap and add the address.
  • With the right pen, you can write the address on a dry swash of colour.
#

Bold Lettered Envelope Art

2150 ii 7

Supplies for hand-lettered envelopes

  • Crayola Gold Metallic paint markers with bullet-shaped tips—not chiseled or angled—to make lines with a consistent weight (that’s called monoline lettering) or Metallic Markers
  • Crayola Signature Metallic Outline Paint Markers & Project Glitter Markers or paint markers in white, red and green (or another fun, limited colour palette)
  • Pencil
2150 ii 8

How to create envelopes with bold lettering

  • Before you start, lightly sketch out the name and address—and maybe any other designs you want to add. It’s easy to draw pine and holly branches and berries, stars and diamonds, accent marks and simple doves.
  • Make the name the star—go big and bold, but don’t forget to leave room for the address. (Unless you’re hand-delivering a card! Then the name can be super huge.)
  • Let each colour dry before adding the next.
#

Easy Painted Envelope Backgrounds

2150 ii 9

Supplies for painted backgrounds

  • Crayola Brush Markers or acrylic paint and brushes
  • Crayola permanent markers (for addressing)
  • Scrap paper
2150 ii 10 1

How to paint backgrounds to make addresses stand out

  • Play around with techniques and designs—like translucent washes or snowy circles—on scrap paper or extra envelopes. Test the markers you’ll use for addresses on your backgrounds once they dry.
  • Slide a piece of paper into your envelope before you paint to prevent bleed-through.
  • Paint designs on your envelopes and let them dry.
  • Once you’re absolutely positively certain they’re dry, add the addresses with permanent markers.
#

Bonus Tip: Wrapping Paper Envelope Liners

2150 ii 11 1

Supplies for wrapping paper envelope liners

  • Envelopes
  • Wrapping paper
  • Ruler
  • Scissors or craft knife
  • Glue stick
  • Optional: Chipboard (cereal boxes are perfect) or poster board for templates
2150 ii 12 1

How to add envelope liners

If you’re just doing a few liners, follow the directions below. If you decide to make a whole bunch, make a template using chipboard or poster board (first three steps). Then trace the template onto the wrapping paper and follow the last two steps.

  • Open the flap of an envelope and lay it open and flat on the reverse side of a piece of wrapping paper.
  • Trace the envelope shape onto the wrapping paper and cut it out.
  • Cut a sliver (1/8″ or less) off each side and about 1/2″ off the bottom.
  • Slip the liner into the envelope, design up, and close the envelope, creasing the liner.
  • Open the envelope and glue the liner in place.
#

Another Bonus Tip: Christmas Card-fetti

2150 ii 8b

What’s a Christmas card party without confetti? We much prefer the giant kind, cut with paper punches from tissue paper. (Find the easiest DIY tips here.) Sprinkle a few pieces inside a card or use a glue stick to decorate the envelope. Circles are classic and perfect…but snowflakes or trees or other holiday icons would also be pretty great, too.

More pro tips to decorate Christmas cards and more

More envelope advice

  • Need some inspiration for your decorated envelope? Just look at the card. You can doodle your own versions of patterns or illustrations, use a complementary colour palette or riff on the lettering style.
  • If you’re using an odd-sized (square or vertical) envelope, make sure you’re using the right postage. Canada Post has all kinds of helpful hints for holiday mail.
  • Make sure everything gets where it’s going (and answer those pesky etiquette questions) with our tips on addressing envelopes and getting titles right.

Everything else about holiday cards

And hints for displaying holiday cards

NOTE: All envelopes shown are decorated with made-up names and addresses so we don’t violate anyone’s privacy.