A quick hint before we start: Yes, this is DIY “fall decor.” But you can change up the colour palette and the decorations work for any season or setting at all.
Ridiculously Easy (and Cheap) DIY Fall Decor
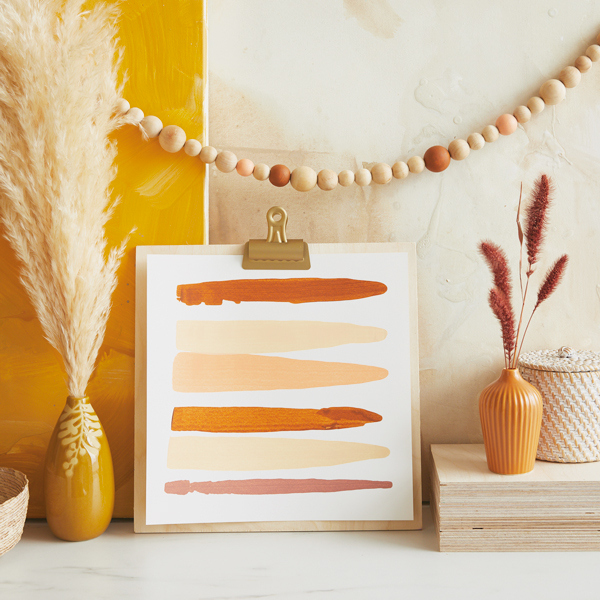
You know that thing where the season changes and you want to tweak your decorations a little—just so you feel it? These two DIY fall decor pieces just take a few craft supplies and a little time, and the artwork and garland you create will add a touch of autumn to any corner of your home.

What you’ll need:
- Sheet of watercolour paper
- Index cards
- 4-6 colours of acrylic paint in complementary or contrasting colors (get inspiration from a favourite piece of art, fabric, an outfit, a poster or the colours in your room)
- Paintbrush (optional)
- Display option 1: Sheet of plywood about 1″ longer and 1″ wider than the watercolour paper and a bulldog or binder clip
- Display option 2: Clipboard larger than the watercolour paper
- Display option 3: Wooden clamp pant hanger

Squeeze some dots of paint down one side of the watercolour paper, about an inch from the edges and an inch apart.
Pro tip: It’s not a bad idea to test this one out on some less fancy paper first—just to get the size of the dots and the distance right.

Hold an index card perpendicular to the watercolour paper, just outside of the paint. (Make sure the dots are completely inside the index card—you may have to tape two cards together to cover them all.)
Grab the edge of the watercolour paper and drag the index card—and the paint with it—all the way across the page.

Touch up the stripes with a paintbrush if you’d like. Once the paint is dry, display the piece using one of the options listed above.
What you’ll need:
- Unfinished wooden beads in a few different sizes
- Jute twine that fits through the beads
- Acrylic paint (use the same colours as you use for the painted stripes)
- Thin masking tape
- Jar
- Paintbrushes
- Scissors
Decide how long you want your garland to be and cut a piece of jute twine about 3 inches longer than that.
Lay the twine on a table and line up beads next to it to get the arrangement you’d like.

Paint some or all the beads. For a little variation, you can try any of the following:
- Paint beads with solid colours.
- Mask parts of the beads to add stripes or colour blocking.
- Add dots with the tip of a paintbrush.
Pro tip: Fit the bead on the handle of a paintbrush while you’re painting to keep your fingers tidy, then rest the paintbrush in a jar to dry.

Make an overhand loop knot in one end of the twine and begin stringing the beads.
When you get to the end, make another overhand loop knot.

If want to add another finishing touch, make an oversize tassel for each end using more of the twine.
This video will show you how: Just wrap the neck with much more jute and for far longer than feels reasonable to get this lovely chunky effect.
Now it’s time to make your vignette: Stage your DIY Fall Decor somewhere you can admire them every day.
Pro tip: Pampas grass is a trendy fall accessory for your vases. With its rise in popularity, it’s become super easy to find online or in craft stores.